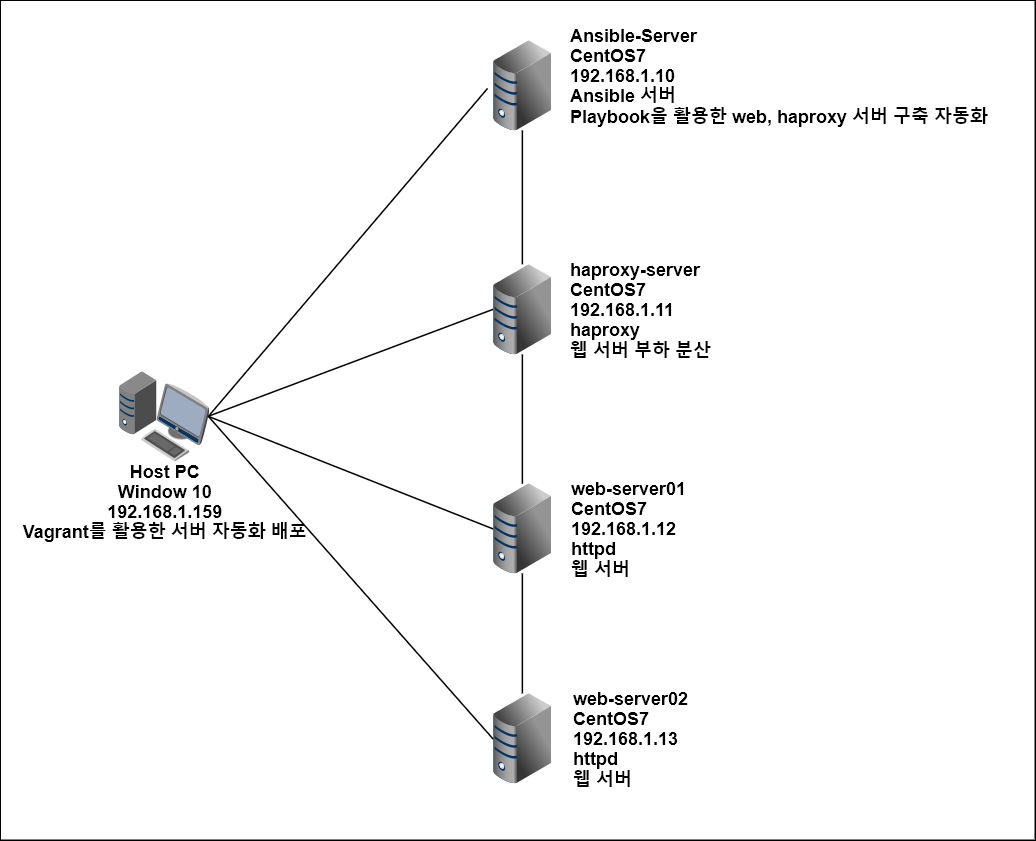
1. 구성도 및 계획

1. Host PC에서 Vagrantfile을 작성하여 Ansible-Server 및 총 4대의 서버 프로비저닝
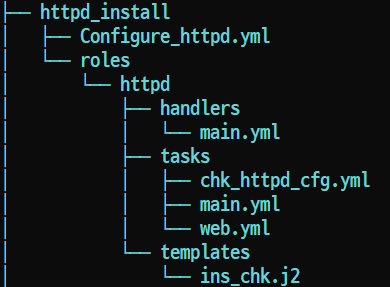
2. Host PC에서 httpd template을 작성하고 Ansible-Server를 프로비저닝하면서 해당 탬플릿을 실행하여 httpd 웹 서버를 자동으로 구성
3. Host PC에서 haproxy.yml을 작성하고 Ansible-Server를 프로비저닝하면서 해당 플레이북을 동작시켜 자동으로 haproxy 로드벨런서 구성
4. 192.168.1.11로 접속시 정상적으로 웹서버에 접근이 가능하며 web-server01과 web-server02에 Round-Robin 메커니즘으로 번갈아가면서 한 번씩 접속된다.
2. Vagrantfile 작성
# Vagrantfile

Vagrant_API_Version ="2"

Vagrant.configure(Vagrant_API_Version) do |config|

  #haproxy-server
  config.vm.define:"haproxy-server" do |cfg|
     cfg.vm.box = "centos/7"
	 cfg.vm.provider:virtualbox do |vb|
	   vb.name="haproxy-server"
	   vb.customize ["modifyvm", :id, "--cpus",1]
	   vb.customize ["modifyvm", :id, "--memory",1024]
	 end
	 cfg.vm.host_name="haproxy-server"
	 cfg.vm.synced_folder ".", "/vagrant", disabled: true
	 cfg.vm.network "public_network", ip: "192.168.1.11"
	 cfg.vm.network "forwarded_port", guest: 22, host: 19211, auto_correct: false, id: "ssh"
	 cfg.vm.provision "shell", path: "bash_ssh_conf_CentOS.sh"
  end

  #web-server01
  config.vm.define:"web-server01" do |cfg|
     cfg.vm.box = "centos/7"
	 cfg.vm.provider:virtualbox do |vb|
	   vb.name="web-server01"
	   vb.customize ["modifyvm", :id, "--cpus",1]
	   vb.customize ["modifyvm", :id, "--memory",1024]
	 end
	 cfg.vm.host_name="web-server01"
	 cfg.vm.synced_folder ".", "/vagrant", disabled: true
	 cfg.vm.network "public_network", ip: "192.168.1.12"
	 cfg.vm.network "forwarded_port", guest: 22, host: 19212, auto_correct: false, id: "ssh"
	 cfg.vm.provision "shell", path: "bash_ssh_conf_CentOS.sh"
  end

  #web-server02
  config.vm.define:"web-server02" do |cfg|
     cfg.vm.box = "centos/7"
	 cfg.vm.provider:virtualbox do |vb|
	   vb.name="web-server02"
	   vb.customize ["modifyvm", :id, "--cpus",1]
	   vb.customize ["modifyvm", :id, "--memory",1024]
	 end
	 cfg.vm.host_name="web-server02"
	 cfg.vm.synced_folder ".", "/vagrant", disabled: true
	 cfg.vm.network "public_network", ip: "192.168.1.13"
	 cfg.vm.network "forwarded_port", guest: 22, host: 19213, auto_correct: false, id: "ssh"
	 cfg.vm.provision "shell", path: "bash_ssh_conf_CentOS.sh"
  end

  #Ansible-Server
  config.vm.define:"ansible-server" do |cfg|
     cfg.vm.box = "centos/7"
	 cfg.vm.provider:virtualbox do |vb|
	   vb.name="Ansible-Server"
	 end
	 cfg.vm.host_name="ansible-server"
	 cfg.vm.synced_folder ".", "/vagrant", disabled: true
	 cfg.vm.network "public_network", ip: "192.168.1.10"
	 cfg.vm.network "forwarded_port", guest: 22, host: 19210, auto_correct: false, id: "ssh"
	 cfg.vm.provision "shell", path: "bootstrap.sh"
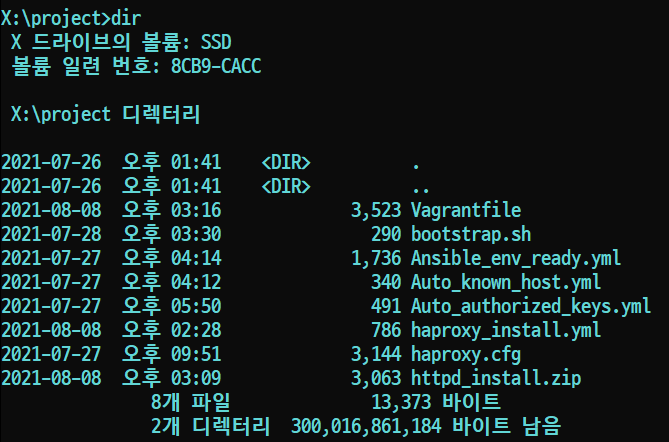
	 cfg.vm.provision "file", source: "Ansible_env_ready.yml", destination: "Ansible_env_ready.yml"
	 cfg.vm.provision "shell", inline: "ansible-playbook Ansible_env_ready.yml"
	 cfg.vm.provision "file", source: "Auto_known_host.yml", destination: "Auto_known_host.yml"
	 cfg.vm.provision "shell", inline: "ansible-playbook Auto_known_host.yml", privileged: false
	 cfg.vm.provision "file", source: "Auto_authorized_keys.yml", destination: "Auto_authorized_keys.yml"
	 cfg.vm.provision "shell", inline: "ansible-playbook Auto_authorized_keys.yml --extra-vars 'ansible_ssh_pass=vagrant'", privileged: false
	 cfg.vm.provision "file", source: "httpd_install.zip", destination: "httpd_install.zip"
	 cfg.vm.provision "shell", inline: "yum -y install unzip"
	 cfg.vm.provision "shell", inline: "unzip httpd_install.zip", privileged: false
	 cfg.vm.provision "shell", inline: "ansible-playbook httpd_install/Configure_httpd.yml", privileged: false
	 cfg.vm.provision "file", source: "haproxy.cfg", destination: "haproxy.cfg"
	 cfg.vm.provision "file", source: "haproxy_install.yml", destination: "haproxy_install.yml"
	 cfg.vm.provision "shell", inline: "ansible-playbook haproxy_install.yml", privileged: false
  end

end
Ansible Server와 Load-Balancer Server 그리고 두 대의 Web Server를 구성하기 위한 Vagrantfile이다.
Ansible-Server 구성에는 node들과 ssh키 교환 및 인증에 관한 yml 파일 및 sh 파일 실행이 포함되어있다.
또한, haproxy를 구성하기 위한 yml 파일과 httpd 패키지 구성을 위한 template를 사용하도록 설정되어 있다.
3. Ansible_env_ready.yml 작성
# Ansible_env_ready.yml

---
- name: Setup for the Ansible's Enviroment
  hosts: localhost
  gather_facts: no

  tasks:
    - name: Add "/etc/hosts"
      blockinfile: |
        dest=/etc/hosts
        content="
          192.168.1.10 server
          192.168.1.11 haproxy
          192.168.1.12 web01
          192.168.1.13 web02"

    - name: Add "/etc/ansible/hosts"
      blockinfile: |
        dest=/etc/ansible/hosts
        content="
          [nodes]
           haproxy
           web01
           web02
          [web]
           web01
           web02
          [haproxy]
           haproxy"

    - name: Install sshpass for Authentication
      yum:
        name: sshpass
        state: present

    - name: Install vim-enhanced
      yum:
        name: vim-enhanced
        state: present

    - name: Install git
      yum:
        name: git
        state: present

    - name: Download pathogen.vim
      shell: "curl -fLo /home/vagrant/.vim/autoload/pathogen.vim https://tpo.pe/pathogen.vim"

    - name: Git clone vim-ansible-yaml
      git:
        repo: 'https://github.com/chase/vim-ansible-yaml.git'
        dest: /home/vagrant/.vim/bundle/vim-ansible-yaml

    - name: Configure vimrc
      lineinfile:
        dest: /home/vagrant/.vimrc
        line: "{{ item }}"
      with_items:
        - "set number"
        - "execute pathogen#infect()"
        - "syntax on"

    - name: Configure Bashrc
      lineinfile:
        dest: /home/vagrant/.bashrc
        line: "{{ item }}"
      with_items:
        - "alias vi='vim'"
        - "alias ans='ansible'"
        - "alias anp='ansible-playbook'"
4. bootstrap.sh 작성
# bootstrap.sh

#! /usr/bin/env bash

#ansible 설치
yum install epel-release -y
yum install ansible -y

#환경설정 초기 파일 구성 for vagrant Only
mkdir -p /home/vagrant/.vim/autoload /home/vagrant/.vim/bundle
touch /home/vagrant/.vimrc
touch /home/vagrant/.bashrc
ansible-server에 ansible을 설치하고 vim을 활용하여 ansible playbook을 작성시에 글자에 색을 입히기 위한 설정이 포함되어 있다.
5. Auto_known_host.yml 작성
# Auto_known_host.yml
---
- hosts: nodes
  connection: local
  serial: 1
  gather_facts: no

  tasks:
  - command: /usr/bin/ssh-keyscan -t ecdsa {{ ansible_host }}
    register: keyscan

  - lineinfile:
      name=~/.ssh/known_hosts
      create=yes
      line={{ item }}
    with_items:
      - "{{ keyscan.stdout_lines }}"
known_hosts 파일에 접속 대상의 ssh키를 저장하기 위하여 필요한 playbook이다.
6. Auto_authorized_keys.yml 작성
---
- hosts: nodes
  gather_facts: no

  tasks:
  - name: ssh-keygen
    connection: local
    command: "ssh-keygen -b 2048 -t rsa -f ~/.ssh/id_rsa -q -N ''"
    ignore_errors: yes
    run_once: true

  - name: read id_rsa.pub
    connection: local
    command: "cat ~/.ssh/id_rsa.pub"
    register: id_pub
    run_once: true

  - name: remote lineinfile for authorized_keys
    lineinfile:
      dest: /home/vagrant/.ssh/authorized_keys
      line: "{{ id_pub.stdout }}"
playbook을 동작시킬 때 -k 옵션을 사용하여 비밀번호를 입력하는 과정 없이 실행시킬 수 있도록 ssh 키를 ansible-server와 노드들간에 교환하도록 하는 playbook이다.
7. haproxy_install.yml 작성
# haproxy_install.yml

---
- name: install haproxy
  hosts: haproxy
  become: yes
  gather_facts: no

  tasks:
    - name: install haproxy
      yum:
        name: haproxy
        state: present

    - name: Configure haproxy
      copy:
        src: /home/vagrant/haproxy.cfg
        dest: /etc/haproxy/haproxy.cfg
        mode: 0644

    - name: start firewalld
      service:
        name: firewalld
        state: started

    - name: open 80 port
      firewalld:
        permanent: yes
        immediate: yes
        port: 80/tcp
        state: enabled

    - name: reload firewalld
      systemd:
        name: firewalld
        state: reloaded

    - name: start haproxy
      service:
        name: haproxy
        state: started
haproxy를 설치 및 구성하고 실행하는 플레이북이다. haproxy.cfg는 미리 작성하여 copy 모듈을 사용하여 붙여넣는 방식으로 설정했다.
8. haproxy.cfg
#---------------------------------------------------------------------
# Example configuration for a possible web application.  See the
# full configuration options online.
#
#   http://haproxy.1wt.eu/download/1.4/doc/configuration.txt
#
#---------------------------------------------------------------------

#---------------------------------------------------------------------
# Global settings
#---------------------------------------------------------------------
global
    # to have these messages end up in /var/log/haproxy.log you will
    # need to:
    #
    # 1) configure syslog to accept network log events.  This is done
    #    by adding the '-r' option to the SYSLOGD_OPTIONS in
    #    /etc/sysconfig/syslog
    #
    # 2) configure local2 events to go to the /var/log/haproxy.log
    #   file. A line like the following can be added to
    #   /etc/sysconfig/syslog
    #
    #    local2.*                       /var/log/haproxy.log
    #
    log         127.0.0.1 local2

    chroot      /var/lib/haproxy
    pidfile     /var/run/haproxy.pid
    maxconn     4000
    user        haproxy
    group       haproxy
    daemon

    # turn on stats unix socket
    stats socket /var/lib/haproxy/stats

#---------------------------------------------------------------------
# common defaults that all the 'listen' and 'backend' sections will
# use if not designated in their block
#---------------------------------------------------------------------
defaults
    mode                    http
    log                     global
    option                  httplog
    option                  dontlognull
    option http-server-close
    option forwardfor       except 127.0.0.0/8
    option                  redispatch
    retries                 3
    timeout http-request    10s
    timeout queue           1m
    timeout connect         10s
    timeout client          1m
    timeout server          1m
    timeout http-keep-alive 10s
    timeout check           10s
    maxconn                 3000

#---------------------------------------------------------------------
# main frontend which proxys to the backends
#---------------------------------------------------------------------
frontend  main *:80
    acl url_static       path_beg       -i /static /images /javascript /stylesheets
    acl url_static       path_end       -i .jpg .gif .png .css .js

    use_backend static          if url_static
    default_backend             app

#---------------------------------------------------------------------
# static backend for serving up images, stylesheets and such
#---------------------------------------------------------------------
backend static
    balance     roundrobin
    server      static 127.0.0.1:80 check

#---------------------------------------------------------------------
# round robin balancing between the various backends
#---------------------------------------------------------------------
backend app
    balance     roundrobin
    server  app1 192.168.1.12:80 check
    server  app2 192.168.1.13:80 check
frontend main을 80번 포트로 서비스하도록 설정한다.
backend app에서 로드 벨런스할 서버의 IP 주소를 지정한다.
8. httpd 설치 Template 생성

8.1 Configure_httpd.yml
---
- name: Install nginx on the nodes
  hosts: web
  become: yes

  roles:
    - { role: ./roles/httpd    }
Configure_httpd.yml에 의해 httpd 패키지 설치가 진행된다.
8.2 main.yml (handlers)
---
- name: Restart httpd web server
  service: name=httpd state=restarted
httpd 데몬을 재실행하는 모듈이 작성되어 있으며 차후에 httpd가 구성이 완료되면 호출된다.
8.3 main.yml (tasks)
- name: httpd for Any Linux
  include_tasks: "web.yml"
- name: Check httpd config
  include_tasks: chk_httpd_cfg.yml
- name: Check httpd service
  debug: msg="{{lookup('template','ins_chk.j2').split('\n')}}"
web.yml 과 chk_httpd_cfg.yml을 호출하여 설치를 진행한다.
ins_chk.j2 파일을 사용하여 디버그 메시지를 출력한다.
8.4 chk_httpd_cfg.yml
- command: "rpm -qa | grep httpd"
  register: httpd
- debug: msg="{{ httpd.stderr_lines }}"
httpd가 설치되었는지 확인하기 위한 명령어를 debug 메시지로 출력한다.
8.5 web.yml
- name: Install httpd web server
  action : "{{ ansible_pkg_mgr }} name=httpd state=present"

- name: start firewalld
  service:
    name: firewalld
    state: started

- name: open 80 port
  firewalld:
    permanent: yes
    immediate: yes
    port: 80/tcp
    state: enabled

- name: reload firewalld
  systemd:
    name: firewalld
    state: reloaded

- name: File Touch
  file:
    path: /var/www/html/index.html
    state: touch
    mode: 0644

- name: Configure index.html
  lineinfile:
    dest: /var/www/html/index.html
    line: <html><body><h1>This is Web-Server</h1></body></html
  notify:
    - Restart httpd web server
httpd를 설치하고 구성을 진행하는 파일이다. 마지막에 httpd 구성을 완료하면 notify를 통해 handlers의 main.yml을 호출하여 httpd 데몬을 재실행한다.
8.6 ins_chk.j2
{% if ansible_distribution == 'CentOS' and ansible_distribution_major_version == '7' %}
   [ OS : CentOS ]
    >> yum list installed | grep httpd
    OR
    >> systemctl status httpd
{% elif ansible_distribution == 'CentOS' and ansible_distribution_major_version < '7' %}
   [ OS : CentOS ver6 ]
    >> yum list installed | grep httpd
    OR
    >> service httpd status
{% else %}
    >> service httpd status (* Gernally)
{% endif %}
CentOS 버전별로 httpd가 정상 설치되었는지 확인할 수 있도록 작성된 jinja2 형식의 파일이다.
9. 테스트

# vagrant upVagrantfile이 존재하는 디렉터리에서 vagrant up 명령어를 실행하면 설치가 진행된다.

설치가 모두 완료된 후 haproxy 서버의 IP 주소로 접근하면 부하 분산되어 각 웹서버로 번갈아가면서 접속된다.
10 Git Repository
아래 리포지토리에서 다운받아 위 실습을 진행해볼 수 있다.
'Ansible' 카테고리의 다른 글
| Ansible Role 및 galaxy 활용하기 (0) | 2021.07.25 |
|---|---|
| Ansible Template 활용하기 (0) | 2021.07.24 |
| Ansible Handler & Vars (0) | 2021.07.23 |
| 기존에 작성한 Playbook을 짜임새 있게 재구성하기 (0) | 2021.07.22 |
| include_tasks와 if를 활용한 nginx 설치 플레이북 작성 (0) | 2021.07.22 |