[심화] 앤서블(Ansible)을 깊이 있게 활용하기 - 인프런 | 학습 페이지 (inflearn.com)
[심화] 앤서블(Ansible)을 깊이 있게 활용하기 - 인프런 | 학습 페이지
지식을 나누면 반드시 나에게 돌아옵니다. 인프런을 통해 나의 지식에 가치를 부여하세요....
www.inflearn.com
아래 링크된 기존 글에서 작성한 nfs.yml 파일을 좀 더 짜임새 있게 구성해보도록 할 것이다.
Vagrant로 구성한 CentOS 관리하기 (tistory.com)
Vagrant로 구성한 CentOS 관리하기
[응용] 다양한 환경을 앤서블(Ansible)로 관리하기 with 베이그런트(Vagrant) - 인프런 | 강의 (inflearn.com) [응용] 다양한 환경을 앤서블(Ansible)로 관리하기 with 베이그런트(Vagrant) - 인프런 | 강의 센트O..
cumulus.tistory.com
# nfs_adv.yml
---
- name: Setup for nfs server
  hosts: localhost
  tasks:
    - include_tasks: nfs_server.yml

- name: Setup for nfs clients
  hosts: nodes
  tasks:
    - include_tasks: nfs_clients.yml
include tasks를 활용하여 서버와 클라이언트가 각각의 플레이북으로 설치가 진행되도록 관리한다.
# nfs_server.yml
- name: make nfs_shared directory
  file:
    path: "{{ ansible_user_dir }}/nfs_shared"
    state: directory
    mode: 0777

- name: configure /etc/exports
  become: yes
  lineinfile:
    path: /etc/exports
    line: "{{ ansible_user_dir }}/nfs_shared 192.168.1.0/24(rw,sync)"

- name: nfs service restart
  become: yes
  service:
    name: nfs
    state: restarted
{{ ansible_user_dir }} 은 facts에서 수집하는 것으로 사용자의 홈 디렉터리 즉, /home/vagrant 를 의미한다.
공유될 디렉토리를 생성하고 /etc/exports에 내용을 추가한 뒤 nfs를 재시작하는 순서로 tasks가 진행된다.
# nfs_clients.yml
- name: make nfs_client directory
  file:
    path: "{{ ansible_user_dir }}/nfs"
    state: directory

- name: mount point directory as client
  become: yes
  mount:
    name: "{{ ansible_user_dir }}/nfs"
    src: "{{ ansible_env.SSH_CLIENT.split()[0] }}:/home/vagrant/nfs_shared"
    fstype: nfs
    opts: nfsvers=3
    state: mounted
ansible_env.SSH_CLIENT 은 엔서블 컨트롤 머신 IP(192.168.1.10), 앤서블 인터널 포트(54360), ssh포트(22)의 순서로 배열로 구성되어있다. split 함수를 사용하여 배열에서 [0]번째 값인 앤서블 컨트롤 머신 IP를 추출하게 된다.
ansible-playbook nfs_adv.yml플레이북을 실행해주고 설치를 진행한다.
구축 테스트

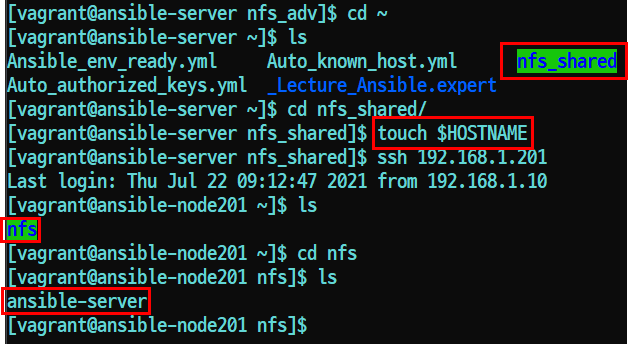
ansible-server가 nfs 서버 역할이므로 nfs_shared 디렉터리에 자신의 호스트 네임으로 파일을 한 개 생성한다.
그 이후 ssh로 nfs_client가 설치된 노드들중 하나에 접속하여 nfs 디렉터리 내부 파일을 조회해보면 ansible-server 라는 이름의 파일이 존재한다.
'Ansible' 카테고리의 다른 글
| Ansible Template 활용하기 (0) | 2021.07.24 |
|---|---|
| Ansible Handler & Vars (0) | 2021.07.23 |
| include_tasks와 if를 활용한 nginx 설치 플레이북 작성 (0) | 2021.07.22 |
| Ansible FACT(s) 활용 (0) | 2021.07.21 |
| Ansible 구성 authorized_keys 등록 자동화 (0) | 2021.07.21 |